Wednesday, January 13, 2010

Project 4: Plush Sticky Bomb

Click to enlarge

Materials:
  • Craft felt
  • Thread
  • Polyfill
I am behind on posting my daily projects because of computer problems and because some of them are turning out to be much more time-consuming than originally expected. I'm working on it!

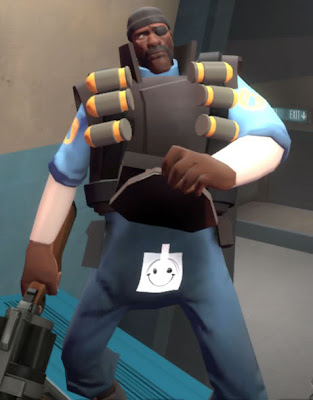
This project, my friends, is a plush version of a sticky bomb from one of my favorite video games, Team Fortress 2. A quick summary:

This character:
fires these:
out of one of these:

They stick to things. When you press a certain button, they do this:
You would have never guessed, right?

Anyway, I the tutorial for the plush version is right here. It took so much more time to construct than I thought it would! It must be all the fiddly cutting and hand sewing. I'm proud of it even though it turned out sort of messy – the amount of felt pieces on this thing kind of disguise all the imperfections.


If I ever do this again, I want to try making the spikes out of Velcro hooks so it actually sticks to things! Wouldn't that be awesome?

Saturday, January 9, 2010

Project 3: Bird Painting

Click to enlarge

Materials:
  • Canvas board
  • Found/recycled objects
  • Acrylic paint
This painting is for a friend of mine. It was created through many alternative techniques; I finger painted, smeared, sprayed, dripped, poured, and sponged, only using a limited amount of brushwork. There's a feather embedded in the paint as well as some glitter. I still have to seal it, though – all I have is satin finish fixative and I want this to be matte.

A little back story on me and painting:
For most of my life, I took art classes – drawing, painting, sculpting, whatever. I find the techniques I weren't taught the most satisfying, however; there's just something gratifyingly visceral about dipping your fingers right in the medium and following your instinct rather than planning something. I find painting realistic pictures boring. Any artist who has been through as much training as I have can manage that; I take my joy from unrestrained creative activity rather than the product.

It's usually how I work, in any case. My original ideas for paintings are always much different then the final work; my thoughts are always evolving. The process of creation defines the outcome rather than a preconceived plan. I always use tons of paint; this piece took so long because there are so many layers of paint I had to let dry. I like seeing a piece evolve layer by layer, but I also like experimenting. Sometimes I take risks, try techniques that don't work, so I just have to deal with my mistakes in the next layer. I barely ever feel like a piece is "ruined", it's just going in a new direction.

I take the same sort of joy from painting that kids do. Children don't care about whether they are "good" painters, they just have fun doing it! Why shouldn't we be the same way?
Friday, January 8, 2010

Project 2: T-Shirt Necklace

Click to enlarge

Materials:
  • T-shirt
This is a massively easy project that I've been meaning to do for a long time. Since my Friday project is taking a long time, I decided this would be a quick fix for Thursday.

The necklace itself is inspired by the Necklush, an accessory which has recieved a bunch of press. Seriously? $24-$74 for something I can make by cutting up a shirt I got at the thrift store? I think not. Save your money; do this:
  1. Get a t-shirt. It shouldn't have any seams down the torso. The larger the shirt, the longer your necklace will be. Plain old unisex shirts (like Hanes Beefy T, etc) work the best. Freebie shirts are great for this.
  2. Lay it out flat.
  3. Cut a straight line under the armpits. I used a ruler, but you can just as easily freehand it.
  4. Cut off the bottom seam.
  5. Cut horizontal strips off the remaining section to form loops. Mine were a little wider than an inch; if you want strands of different thickness modify accordingly.
  6. Stretch out the loops (like a rubber band). The jersey fabric will roll up and won't fray.
  7. Gather the loops. Cut a strip of fabric about an inch wide from the remaining material. Wrap it around all the loops several times and tie a tight square knot to secure. Trim the ends.
That's it! As you can see, my necklace isn't as full as most of the Necklushes, but I could easily have made it with more t-shirts to get more volume.


Any questions?

Thursday, January 7, 2010

Project 1: Crocheted Kitty Hat

Click to enlarge

Materials:
The inaugural post on this blog is actually a leftover Christmas gift for my boyfriend. Yes, it is pink and has kitty ears. I used the Jayne Cobb Hat by Kim Werker as a basic pattern, then went from there.

As a fairly new crocheter (I learned this fall semester), this hat marks a few firsts. First hat, first item I crocheted by request, and the first time I've crocheted with such bulky yarn. I'd heard about the quick-hooking joys of using super bulky weight but never actually experienced it, and whoa, this project flew. From start to finish this hat only took a few hours, including weaving the ends in and knotting the ties.


Close up of the stitchery, for those of you who know/care about that sort of thing. Dime for scale. The original pattern had the body of the hat in half double crochet and the earflaps in single, but I worked all the white portions in single because that yarn was much fatter than the pink.

Ears! I just improvised them as I went along. Very easy to do in crochet. I think that crochet is better than knitting for sculptural work since you usually only hold one stitch at a time on your hook. Then again, I'm biased because I can't knit to save my life (not for lack of trying, mind you).

This project was a definite success: I liked it, the recipient liked it, and my mom says she really likes it too. :) What do you think? If you have any questions, don't hesitate to ask in the comments.